iOS FAQ – How to create daily reports in the field with iNeoSyte Construction Reports App

iOS FAQ – How to create daily reports in the field with iNeoSyte Construction Reports App

If you came to this site from our app – iNeoSyte – this place will be your guideline with step by step instructions on how to make your construction site reports in much faster and better way.

If you haven’t used our field report app yet, this is a great place for you to start doing so.

It’s super easy and if you still wonder why you should keep site records of your daily works on site we explain it in this blog post.

Start with downloading our construction app for your iPhone or iPad by clicking on the icon below:

How do I register with iNeoSyte construction app?

Go to App Store on your iPhone or iPad and search for iNeoSyte or follow the link below:

DOWNLOAD iNeoSyte – Construction App

Download the app and install it on your device.

Tap on the app icon and you will see the main screen where you select – Registration

and you will be directed to another screen.

Type in the information requested:

  • Business email
  • Password
  • First name
  • Second name

Why do we need the above information?

We need your email to send you the link so you can confirm your registration. You can still access the app without confirmation, however, your access will be blocked automatically after two weeks trial period. We need to control the registration process to avoid any scripts and robots getting into the app. It is also a secure way for you to store your field reports.

Of course you need to select your password to make sure your information is stored securely.

First name and second name fields are not obligatory, however, these are used by the app to insert it into the cover sheet of your PDF reports. If you leave them blank your PDF report cover sheet section for name of the report author will also remain blank.

Below the form entry fields you will see Newsletter opt in button. It is switched off by default. It means you will not receive any newsletter from us. If you swipe on the button, your details will be added to our newsletter subscribers list. Don’t worry. We don’t send many emails. Something like 1-4 per calendar month.

Underneath the Newsletter button you will find links to our Privacy Policy. It explains how we use your personal data. Please make sure you familiarise yourself with this documents before you register.

Click here for our Terms of service.

How can I access iNeoSyte construction app?

You can access the app on your mobile device after it has been installed.

You can also access the app through any browser – either on your desktop, laptop or mobile:

https://app.ineosyte.com

You will need to use your log in credentials which you used for the mobile app.

I forgot my password - how do I reset my password?

In order to reset your password for iNeoSyte – Construction Reporting App please go to the link below:

https://app.ineosyte.com/users/password/new

You can do the same from the app. On the main splash screen just tap on Sign in button and next tap on the Reset password text.

How do I create a project for my daily reports?

Tap on + icon to start adding your project. Your project can be your construction site, a property or facility you manage or any other item that you want to start reporting about.

It’s only obligatory to add a project name. However, we recommend that you also add more pieces of information about your project like your client’s name.

Very often contractors use different reference numbers for their construction projects. You may want to add these details as well to make sure the project name is not confused with another similar project. If you don’t have a reference number or you don’t need it, just move on to another text field.

At this point you can already tap Save button in top right corner. But you may want to fill in other information as well to make your work with iNeoSyte easier and to do your site reports much quicker.

How do I edit project details?

You can edit the project details at any point. On the main screen with projects “My Projects” tap on the dots next to the project name. A menu will pop-up, tap on Edit button there.

How do I delete a project?

You can delete any project by tapping on the three dots next to the project name and selecting Delete from the pop up window.

Reports - How do I make my first field report

Once you have created your project you can start adding your daily reports. Just tap on the + button in the bottom right corner and you will see a new screen. Here you can chose what type of a report you want to add.

Default choices are Daily Report and Weekly Report. However, you can add a new type for your report. For example, you may want to title your reports like:

  • Monthly Report
  • Site Walk Report
  • Site Audit
  • Snagging List
  • Quality Inspection Report
  • Safety Inspection Report
  • Site Surveillance Report
  • Field Report
  • Property Check Report
  • Field Check

Whatever name for your report you add you will be able to select it later from the list for future reports.

You will also be able to see the type of reports on Reports screen.

Reports - How do I change the name of my report?

Default choices are Daily Report and Weekly Report.

However, you can add a new type for your report. For example, you may want to title your reports like:

  • Monthly Report
  • Site Walk Report
  • Site Audit
  • Snagging List
  • Quality Inspection Report
  • Safety Inspection Report
  • Site Surveillance Report
  • Field Report
  • Property Check Report
  • Field Check

Whatever name for your report you add you will be able to select it later from the list for future reports.

You will also be able to see the type of reports on Reports screen.

See the screenshots below to see it step by step.

  • Tap on the report type in New Report screen you will be taken to a new screen -> Report Type
  • Tap on the + button and write a new type for your report
  • Complete the report as normal and save it

How do I get automatic weather information into my daily reports for a new project?

It’s very useful that you add location of your project. Our app is integrated with automatic weather information service that downloads weather details based on the location. If you want to add temperature or wind speed automatically to your reports than adding the exact location of your project is necessary.

When you create a new project just go to Location section.

Make sure you have good network and GPS coverage. iNeoSyte may ask you to give it access to your location. You need to agree to it in order to proceed.

Once you see the map you can move it to the desired project location. In order to select the address tap on the map and hold for a second. After that a pin will drop in a place of your pointing. Above the pin you will see a small text box with the address and Select button. Tap on the Select button.

If you don’t know where to point the pin you can simply use the search bar at the top right corner and type the address of your site or facility. Once you’ve typed the address you can tap on Search button in the right bottom corner. Again the pin will drop and will allow you to Select this address.

After you tap on Select button you will go back to the New Project screen.

At this point you can Save your project.

How do I get automatic weather information into my daily reports for an existing project?

You can edit your project by tapping on the three dots button on the right hand side next to your project name on the main My Projects screen. Select Edit from the menu.

Now you can go to Location section. Make sure you have good network and GPS coverage. iNeoSyte may ask you to give it access to your location. You need to agree to it in order to proceed. Once you see a map you need to tap and hold for a second. After that a pin will drop in a place of your pointing. Above the pin you will see a small text box with the address and Select button. Tap on the Select button.

If you don’t know where to point the pin you can simply use the search bar at the top right corner and type the address of your site or facility. Once you’ve typed the address you can tap on Search button in the right bottom corner. Again the pin will drop and will allow you to Select this address.

After you tap on Select button you will go back to the Edit Project screen.

At this point you can Save your project.

How do I add a logo (cover sheet photo) to my reports in my new project?

When you add a new project you can add a logo of your project as an image or you can take a new picture with your camera. This logo will appear on the front sheet of all your reports. You may want to add your company logo, a drawing from this project, an artist impression of completed project or a current picture from the actual construction site.

On your New Project screen just tap on Change project logo button. You will be taken to a camera view. Just below the camera view you can see recent pictures stored in your Photos gallery. Just swipe right for more photos to find the one you’re looking for.

How do I add information about workers into the report?

When you add a new project you can add a logo of your project as an image or you can take a new picture with your camera. This logo will appear on the front sheet of all your reports. You may want to add your company logo, a drawing from this project, an artist impression of completed project or a current picture from the actual construction site.

On your New Project screen just tap on Change project logo button. You will be taken to a camera view. Just below the camera view you can see recent pictures stored in your Photos gallery. Just swipe right for more photos to find the one you’re looking for.

If you want to add information about hours you can type it in the description.

For more detailed information how to process working hours and timesheets, please check the blog post – https://ineosyte.com/manage-timesheets-with-daily-reports-app/

How do I add a logo (cover sheet photo) to my reports in my existing project?

When you Edit an existing project you can add a logo of your project as an image or you can take a new picture with your camera. This logo will appear on the front sheet of all your reports. You may want to add your company logo, a drawing from this project, an artist impression of completed project or a current picture from the actual construction site.

You can edit your project by tapping on the three dots button on the right hand side next to your project name on the main My Projects screen. Select Edit from the menu.

On your Edit Project screen just tap on Change project logo button. You will be taken to a camera view. Just below the camera view you can see recent pictures stored in your Photos gallery. Just swipe right for more photos to find the one you’re looking for.

How to remove work progress, observations or snagging items?

Most of the items in iNeoSyte can be removed with a swipe left motion.

The same way it works in other iOS apps.

How to add photos to your report

To add photos you need to add them to one of the categories like Observations, Work Progress or Snagging List. Tap on the + button next to the category name. You will see a new screen. There’s a photo adding option there. Tap again on + to add photos to your entry within your construction report.

You can either add a photo from your image gallery by selecting photos from the image bar above the shutter button or by tapping on the rectangle in the bottom left corner.

After that you can browse for your photos much faster.

We decided to limit the amount of photos to 3 as some users were abusing this option trying to save loads of photos. This later influenced the speed in which the reports were shared and generated due to the mobile internet restrictions.

Please see the screenshots below for more details on how to add photos to your field reports.

How to share your reports

There are several ways you can share you reports with others. Most of them are available to everyone but some options will depend on the other apps installed on your mobile device.

In this section we will cover basic sharing options via:

  1. Our mail server
  2. Mail clients like Apple Mail or Gmail
  3. Mail clients on desktop/laptop machines

Re 1. This is the easiest option for you as the app user because it allows you to automate the sharing process and saves you tons of time. If you send your reports with the same people on the project all the time or even quite frequently this is the best option for you.

In order to share your PDF reports using this way you need to add e-mail addresses of persons with whom you want to share the reports. You can put your own e-mail address and your colleagues’ and co-workers’ e-mail addresses as well. You can add these in two locations.

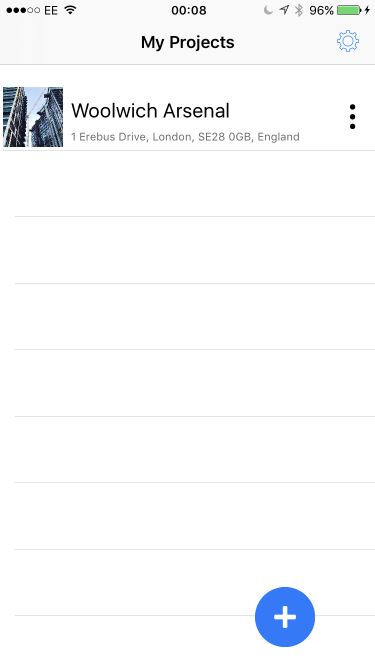
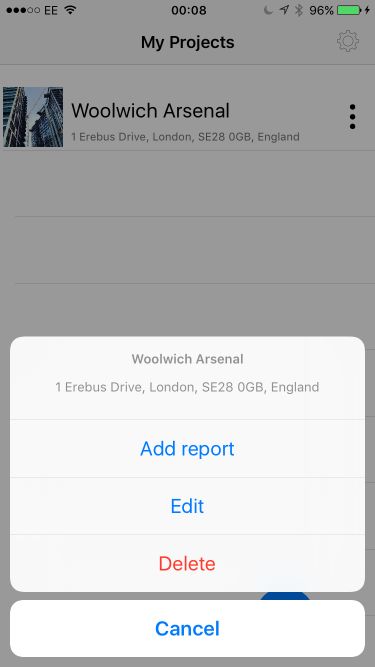
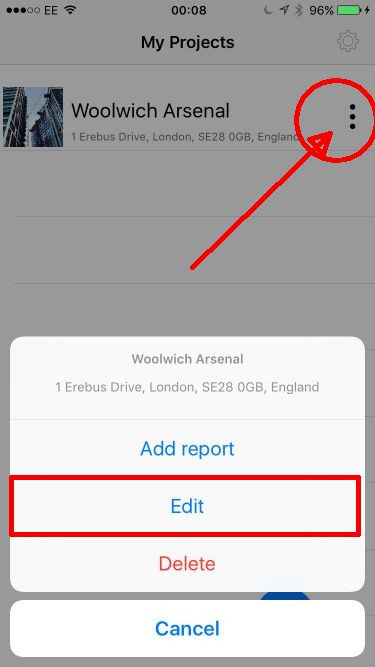
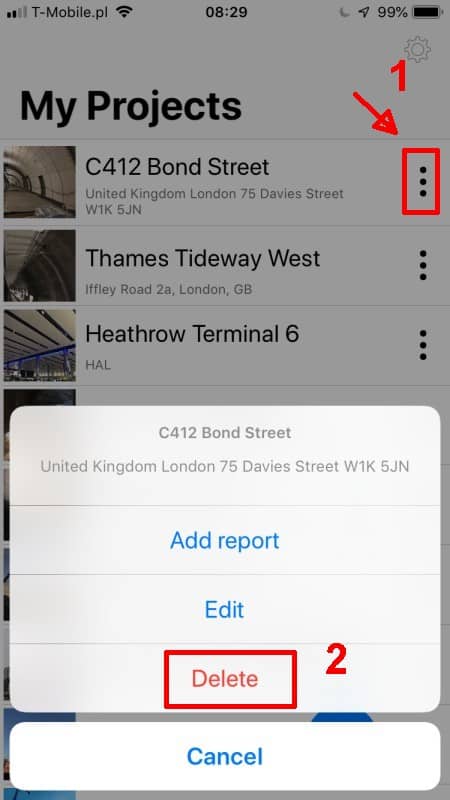
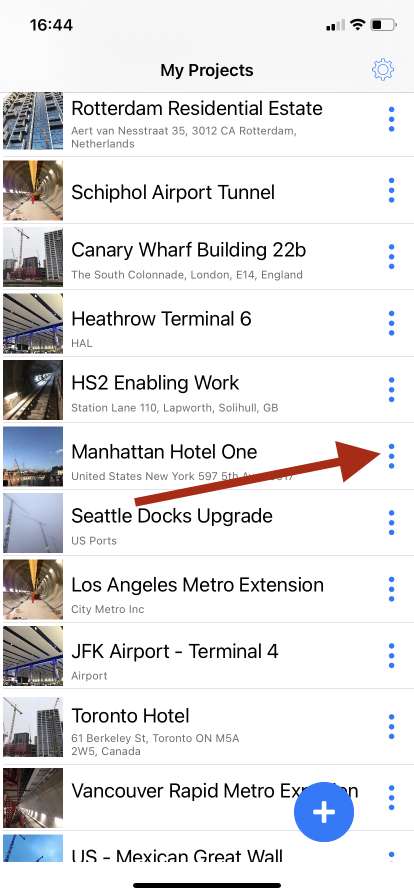
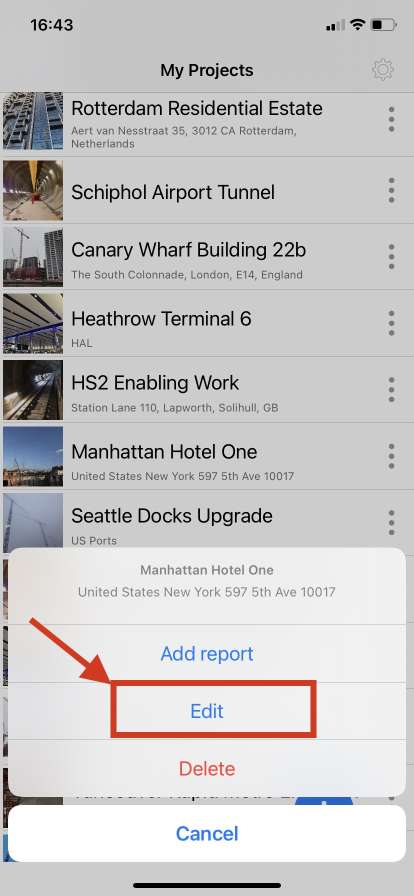
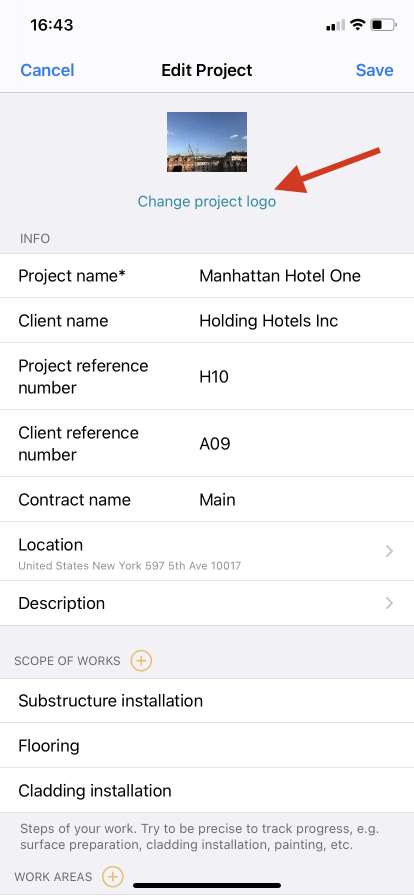
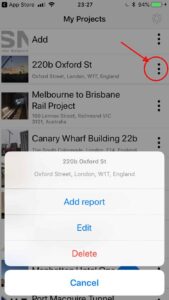
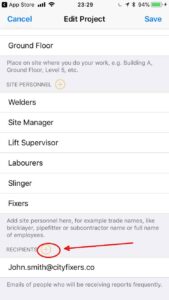
a) Project settings – go to My Projects screen, tap on the 3 vertical dots button and select Edit. Scroll down to RECIPIENTS sections and tap on + icon. Please check for any spelling errors before you save the project settings.

These e-mail addresses will be permanently added to the project. It means that you won’t have to type them again. Whenever you generate PDF report and tap on Send button, these addresses will be added to the recipients list by default.


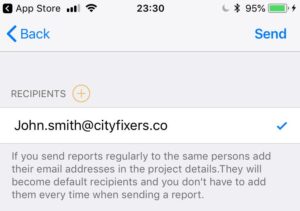
b) Just before sending – if you haven’t added recipients e-mail addresses in the project settings you can still do it just before sending your report. The Send Screen allows you to add e-mail addresses to the project reports recipients list.


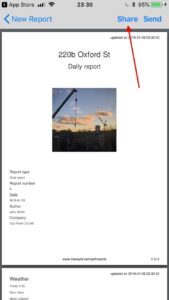
Once you have added e-mail addresses of all recipients you are ready to send your PDF report. When you’re on your PDF view screen, tap on  Send and Send again. Wait a few seconds for the app to communicate with our servers and you should see the message with information that the report has been successfully sent.

Your report recipients will receive an email from our mail server. If you can’t find it in your mailbox within 5 minutes from sending the report please check your SPAM folder. If our mail landed there please mark it as NOT SPAM to make sure it gets into your Inbox next time.

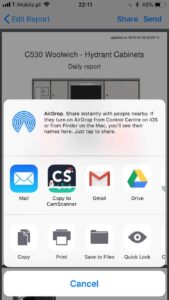
Re 2. Using apps installed on your mobile device.

You can use mail clients like Apple Mail or Gmail to send your report.

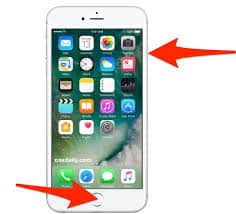
On the PDF screen tap on Share you will see a pop up menu in which you can select an app. This allows you to share a report by using one of the apps installed on your mobile device. For example, if you chose Apple Mail which is the default mail app for iPhones and iPads, your PDF report will be added as an attachment to a new blank email. You will need to add recipients, subject and some text if you want to.


How to add content from e-mails to your reports?

Sometimes you may want to add the content of one of your e-mails into your daily report. This may happen to confirm that for example your customer agreed to do the things certain way or gave you permission to proceed with the works without the approved design at their risk. In order to keep records of that communication you may want to add that email message to your log.

There are two ways to add emails to daily reports through iNeoSyte app:

1. Take a screenshot of the email (open the email and press Home and Power button together for iPhones up to 7, press volume up and power button together for iPhone X – see attached photos)

Now the email is saved in your Photos. This means you can add it to your daily report as an image file.

Just go your report and for example under Observations you can add a note and add the screenshot of the email to the photos.

See the attached screenshots as an example.

2. Go to the email and copy the email text (tap on the text for couple of seconds and you should see a menu with text markers, select the text you want to include in your daily report. Afterwards, you should see “Copy” button above the text. Go back to iNeoSyte app and whether you want to add it under Observations or Additional Notes just tap in the empty text box for couple of seconds and you should see the menu with “Paste” button.

How to log in to the webportal of iNeoSyte

Go to app.ineosyte.com and log in with your app credentials – login and password.

You can also reset your password there and browse, download and create reports.

How to download PDF reports from the iNeoSyte webportal

Once you are logged in just go the Reports section in the menu on the left hand side.

You will notice your reports on the screen.

On the right hand side you can see various icons which allow you to Read, Edit, Delete a report or Download in PDF.

Select the DOWNLOAD PDF icon to download the report to your local drive.